
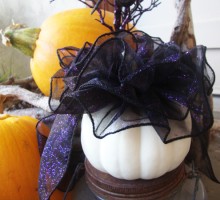
It has been a busy October and we still haven’t gotten up into the attic to get down Halloween decorations. The only decorating that has been done is with those few items that got missed when we put away Halloween LAST year! But because we are feeling the need to have a splash of those fall colors, we decided that we could “make the pathway bright” and fill our doorway with pumpkin cheer! You all know that I love my Everything99cents store – yet another reason! Last Saturday they had pumpkins out front! That’s right, a big box of pumpkins for just a dollar! We got the tiny pumpkins from the grocery store and they were less than a dollar, but the bigger ones? Yep…a dollar! When you can get them that inexpensive, I don’t mind sacrificing one. Measure the approximate height of the pot that will go inside – figure that the wall of the pumpkin will be at least 1″ to 1 1/2″ thick, so choose your pumpkin carefully – then chop off the top and remove the seeds. Your pumpkin pot is now ready to put a pot of posies (also just a dollar) right inside. Easy peasy and cheap! Mixing it up a bit, the little white pumpkin had the perfect stem to attach a sparkly bow on top! It’s a process…but such a fun one. Now I don’t
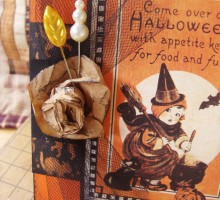
I’ve been so busy baking that I almost let today get away from me without making any cards…ridiculous! Can’t let that happen! So why not stop, take a few minutes and start getting ready for Halloween greeting cards? I couldn’t think of any good reason either. I had a couple of sheets of Graphic 45 Happy Haunting Collection and I love the nostalgic, whimsical look of the artwork, so for today it was the perfect choice for my cards! I had a cute little moon button that I tied up with some linen thread at the top! Don’t you just love the scaredy cat? Use pinking shears along the edge of a 2′ length of crepe paper; gather, put redline tape on the back and apply as a ruffle, tying up with some orange Hug Snug seam binding. It’s kind of hard to see, but I added some Star Dust Stickles to the face on the pumpkin for just a little fun sparkle! This card uses ribbon on the side and three buttons to dress it up. A little black tulle, a brown paper bag flower and some fancy pins give a nice touch! And here’s more of the little quilt in the background! If you haven’t made cards yet today, it isn’t too late! Happy Card Making!
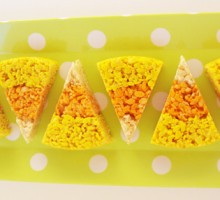
I am so excited…October is finally here! I try to put off all things Halloween until October, but once it arrives, there are so many new things to try that I have to be busy. I spied these little treats on Pinterest and knew this would be a nice and easy addition to my Halloween treat arsenal. Candy corn is one of those iconic treats that shouts Halloween, but it isn’t my favorite candy. Don’t get me wrong…I always buy it and will use it to decorate with, but eating it is a different story. It is way too sweet for my taste buds, but I love the tri-colored shape, so the possibility of using this as a replacement makes me happy! Candy Corn Krispie Treats You will need to gather the following items before you start: 1 large box of Rice Krispies cereal (at least 9 3/4 cups); 2 -10 oz bags of mini marshmallows; 1 cube (1/2 cup) butter – if you cut up the cube of butter into the portions you will need, there will be an extra tablespoon to use on your hands to press the krispie mixture into the cake pan; spray vegetable oil; yellow and orange gel food coloring (like Americolor or Wilton); 2 large mixing bowls, at least one of them microwave-safe; a wisk, a bowl scraper and a large, sturdy spoon; 2 – 8″ cake pans. For the yellow ring: 5 cups
I love the 4th of July. I love the flags, the parades, the picnics and the fireworks! I love going to the flag ceremony and breakfast at our church and then stopping by our little neighborhood’s 4th celebration, where the kids decorate their bikes and have a parade. Barbeques with friends, watermelon (with seeds…it’s more fun to spit!) and corn-on-the-cob…yum! But like everything else, holidays seem to sneak up on me. No matter how hard I try to stay on top of things, they do, they just do. It seems like, and not that long ago, we eased into the month of June and now we only have one full day left! Over a month ago I saw the Authentique Glory Collection and thought, “This will be great for 4th of July cards!” Know what? I got three done…yep, only three. It’s a good thing that red and navy are good colors to have in your stash! Sorry…my camera is a little off on the navy…or maybe that’s my PhotoShop skills! It helps to break up the monotony of my more “girlie” palates. Banners are a good addition for any birthday card, and the red/white/blue palate is yet another reason to celebrate. What would the 4th be without a few stars and stripes? And the season would not be complete without a rocket bursting…right off the card! Here’s to a slower schedule and more time

Cake pops…those little balls of sweetness that are perfect for parties, wedding or picnics…in the shade, of course! They are one of my favorite treats to make and take to a potluck gathering because they pack a lot of bang in their diminutive packaging. But you need something to display the little cuties. I am always on the hunt for ways to display them. One day, while on Pinterest, I saw a super cute idea here and was doubly excited knowing that I had one of the little suitcases up in my workroom. Actually, I have them in pink, purple, orange and chartreuse – hooray! I also have them in different sizes. Add some florist foam inside, and some coordinating paper shred to hide it and you are ready to display. If you have different colors of the same size suitcase, you can use the same foam in the different cases. Let the party begin!

Have you ever watched little kids dish up food at a buffet and think to yourself, “They will never be able eat all that!”? I always have big plans, bigger than I seem to have the energy to accomplish. Last week I was busy making desserts for our family Easter gathering, mostly recipes or ideas that I found on Pinterest: Easter pastels dipped Golden Oreos…I used the leftover candy melts from the cake pops that I made…super easy! Cake Batter Rice Krispie Treats. Yep…they were good enough to make again! Since I was trying to make desserts with things I had on hand, I opted to make Oreo Surprise Cupcakes…I was short on the supplies to make them minty. I was a little short on time and had a “lack of equipment” failure, but they were delicious! I will make these again. I also made cake pops, but ran out of time to take pictures. Megan and I made two batches…one with devil’s food cake and one with white cake. The chocolate ones were dipped in different candy melts and topped with graham cracker crumbs and crunched itty bitty marshmallows (the kind that go into hot chocolate) OR crunched up Reese’s Pieces. The white were plain with swizzled chocolate of a different color…sorry, no pictures of those. It was hard enough to take the above pictures at my brother and sister-in-laws, but
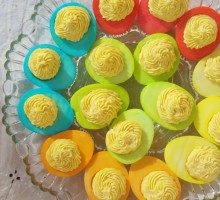
Updated information at the end of the post…in answer to a comment! If you are a “board member” on Pinterest, you know the feeling of panic you can get if you restrain yourself or you are not able to visit that site frequently. With me, I’m afraid that I am going to miss the next best thing to dyeing doilies…and guess what? I was fortunate enough not to miss this brilliant, literally BRILLIANT idea a while ago. Granted, I think this is more of an Easter-ish idea, but with St. Patrick’s Day (ie. leprechauns, pot’o’gold, green things and rainbows) I decided to try my hand at this fun concept. You can see the original post here. To begin with, I’ve been having trouble with hard boiling eggs recently. I go for ages without making them, and I somehow forget how to do them without the grey ring around the yolk. I know that is from over-cooking, but I do not remember how long I’m supposed to cook them. Sometimes I get busy and forget to set the timer or don’t get them in the cold water soon enough/long enough. So when I saw another pin on Pinterest about how to boil an egg, I added it right to my board. Here is THAT original link. It came down to this: Put your eggs in a pot and cover the eggs with cold water, plus about an
I did it, Stephanie...dyed some doilies, except I sprayed them with Glimmer Mist. Anyone want to make some of these dyed doilies? I want to try the food coloring next time. Let me know if you want try it with me!

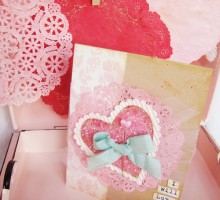
As it turns out, the second attempt was much better than the first...Happy Valentine's Day!

Here they are...Valentine Inchies!


This delicious butterscotch sauce, best when served warm, is quick and easy to make!...

Make your Jell-O Cookies merry, just in time for you Christmas cookie plates!...

I love to bake, but I am basically a lazy baker. It has been a really long time since I baked a...

Oh what fun it is to work with October Afternoon's Holiday Style product line! ...


