

I am so excited! Why, you ask, would I be so excited about 3 spools of white seam binding? It isn’t so much what it is, but rather what it represents. To me, it is three HUNDRED yards of raw material that will be my blank canvas, that when combined with my newly added to stash of this…

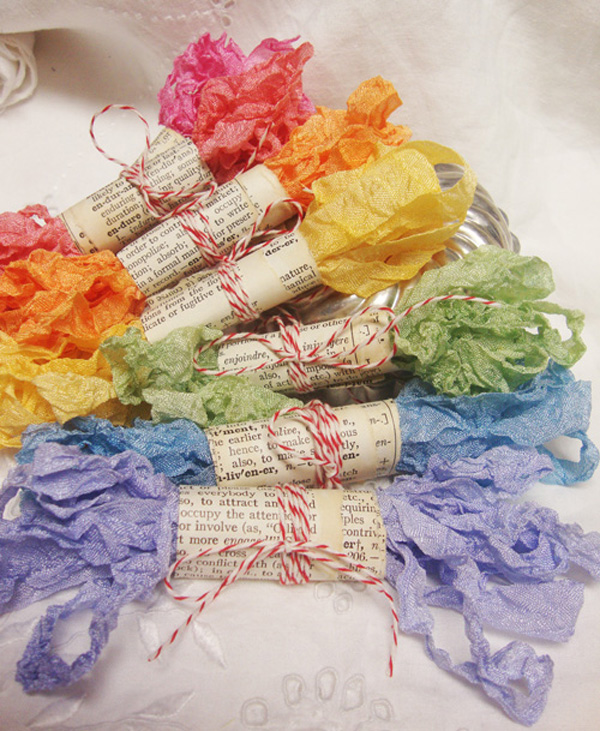
…Glimmer Mist, in no time it will be magically transformed into this!

Isn’t it a beautiful sight?
I have dyed ribbon before. When I first started using Glimmer Mist on my paper art flowers, there was a lot of over-spray. I couldn’t stand the thought of just wiping it up with a paper towel and then throwing it away. So I took a white, cream or light color ribbon and absorbed the color. It really gives it a wonderful hand-dyed look. But I had never used seam binding before. One day I found some beautifully colored seam binding at a little shop and loved the colors, but didn’t really love the price. Then one day I saw some pretty bundles on a website, that linked to an etsy shop, that had a bunch of beautiful piles of something that looked just like the loose weave of the seam binding, and being the resourceful person that I am, I went on a hunt to find it in bulk…and I found it…and that’s why I’m so excited…I get to make my own!
I found a couple of different tutorials on how to make it. Google “how to crinkle ribbon” or hand-dyed wrinkled ribbon if you think you want to try your hand at it. But if you think you can do it from written directions, here you go…
Cut a length of white ribbon. If you plan on wrinkling it (not just dying it, which is also very pretty) and need a certain length, you will want to add a little more because the wrinkling will shorten the yardage. I measure out 4 yards and it ended up about 3 yards, 12 inches.

I like to work on my Ranger non-stick craft sheet. It protects your surface and wipes up easily.
Lightly spray the ribbon with a little water (I rinsed out an empty Glimmer Mist bottle – reduce, reuse, recycle…re-purpose!)…

…just enough to lightly dampen it, tossing it as you go. Next, choose your colors. For the first batch I picked Hydrangea, Purple Pansy and Fully Purple. Start off with the lightest color, Hydrangea.

The seam binding tends to dry lighter than it looks when wet. I moved to the next color, Purple Pansy.

You can see where the color is building. Don’t forget to use the over-spray – it would be a shame to waste such lovely droplets!


I sprayed the darkest color directly onto the craft mat so that I could selectively apply the color to the binding and not get a big glob of it where the spray hits.

Now that is pretty…but not quite done. Take a paper towel and towel dry the binding. This helps to speed up the drying process.

If you don’t want wrinkled seam binding, you can just let this dry. But wrinkling it adds a nice vintage, weathered look.
Wrinkling can be done a number of different ways, which is what I discovered when I went jumping around the Internet. This is what worked best for me.
After you paper towel dry the seam binding, take it and cram it into a little baggie and force it into one corner.

Next, twist it snugly into place. You can put a rubber band around the top to hold it in tightly in place, or just bring the top over it.

Now set it aside, generally overnight. I did a few more colors, just for fun!

In the morning, take the binding out of the baggie and lightly fluff it up; then leave it to finish air drying. If you get impatient, you can use your hair dryer on low to speed it up, but it might relax the wrinkle a bit. Sorry…I didn’t take a picture of the fluffing step, but you can figure it out. The end result?

Love the colors! Looks like a rainbow, don’t you think? Wouldn’t you like some of this? Of course you would. I’d like to order up a nice, big dish of these pretties, please!

Tags: Glimmer Mist dyed ribbon, how to dye seam binding, wrinkled ribbon


Thank you this is great and very appreciated!
You’re welcome! I haven’t played with my seam binding for a while. Thanks for the reminder!
I know…I feel RICH! And the options are limitless when you consider mixing the colors…fun!
LOVE the colors & packaging is perfect! 3 spools…what fun!
i absolutely love it, seems so easy to do!
Oh, that’s lovely! I could use that on a card or in scrapping…even CQ (crazy quilting!)
Oh Helen I love all of the pretty colors! You are so awesome. I would love to have that brightening my craft desk.
A page from an old dictionary and baker’s twine:)
What did you use as your “wrapping”