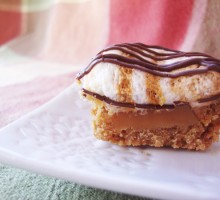
I recently did a post about S’More Bites – small, two-bite treats that are really delicious. But anytime I make something really good, I can’t seem to leave it alone. I tell myself, “Come on…you can do better!” While I try not to brag, I can’t let this one escape sharing simply because it is somewhat similar to the previous post. According to my friend Kent W., these are ridiculous! And here’s the secret ingredient… ingredients! Megan found these Chocolate & Vanilla and Caramel & Vanilla Marshmallows at the Everything99cents store. She didn’t buy a bunch because she wanted to try them first. I thought it would make an interesting deviation on the original S’More Bites. Start with the basic recipe for the graham cracker crust on the S’more Bites page. Make the crust and press it into the mini muffin pan. You can turn on your oven now to 350°; set the crusts aside. Prepare the fillings. Cut the marshmallows in half height-wise. Unwrap the caramels and cut them in half height-wise. Kitchen shears work really well to do these steps. For the candy bars (I used Hershey’s Milk Chocolate is 1.55 oz bars – have 2 or 3 on hand), break into the divided sections and then in half again. If you are using other chocolate, break into smaller chunks and set aside. You will want to do this BEFORE you bake the s’more cups, otherwise you won’t be ready when
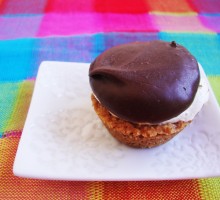
I can’t believe it! Summer is almost over and I have yet to make it to the beach. That’s right – no sandy feet, looking for shells or even much of a sunburn…and I got that at a garage sale! But there’s a church beach party coming soon and I signed up to bring a dessert. What to bring, what to bring? Then I came upon the perfect thing – S’More Bites! I have to admit that I am not much of a traditional S’More lover. Even though I love the taste of this traditional campfire treat, I have an aversion to so many unwashed hands reaching into the same marshmallow bag and the struggling to assemble them, not to mention the messy hands and faces that result while eating them. I know…I’m such a old fuddyduddy! But when I saw these little S’More Bites with the same flavors, pre-assembled and bundled up in one bite (or two), I knew that these would hit the spot, at least for me! (Adapted from the recipe at Pampered Chef.) S’More Bites 7 whole graham crackers (1 cup, finely crushed) 1/4 cup powdered sugar 6 tablespoons butter, melted 4 bars (1.55 ounces) milk chocolate, divided into sections – I decided to make these late at night and didn’t have candy bars, so I used a bag of Nestle’s Milk Chocolate Chips 12 large marshmallows, cut in half height-wise – I had Jumbo Kraft marshmallows,

Summer is a wonderful time for fresh fruits to be incorporated into as many recipes as I possibly can. Raspberries are one of my favorites. When they are on sale I am even happier! I bought several pints of them with the intent of making jam, but when I realized that it was time for another guest blog spot with Rhodes, I knew it would be the perfect time to experiment! You can hop on over to the Rhodes Bake-N-Serv Blog to get step-by-step directions for this easy and yummy recipe…it is good enough to heat up the oven and bake, even in the summer!

When life (or friends) give you lemons, make lemonade...cupcakes!
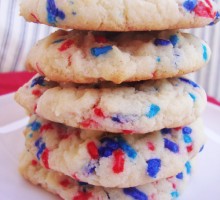
For a quick batch of really delicious, colorful cookies, the journey starts with a white cake mix!
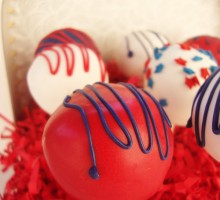
Cake pops…those little balls of sweetness that are perfect for parties, wedding or picnics…in the shade, of course! They are one of my favorite treats to make and take to a potluck gathering because they pack a lot of bang in their diminutive packaging. But you need something to display the little cuties. I am always on the hunt for ways to display them. One day, while on Pinterest, I saw a super cute idea here and was doubly excited knowing that I had one of the little suitcases up in my workroom. Actually, I have them in pink, purple, orange and chartreuse – hooray! I also have them in different sizes. Add some florist foam inside, and some coordinating paper shred to hide it and you are ready to display. If you have different colors of the same size suitcase, you can use the same foam in the different cases. Let the party begin!
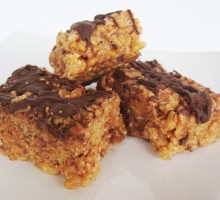
Remember when we used to be satisfied with cupcakes with a little frosting, a chocolate chip cookie or plain old Rice Krispie Treats? It seems like forever ago. Now everything seems to need to be “stuffed with”, “topped with” or with something unexpectedly “tossed into” the mix. With each additional ingredient, those basic, traditional recipes seem to explode with more flavor and are stylishly presented with ingredients that not only compliment the taste, but make them photo-worthy as well. I have a recipe that was passed on to me called Peanut Butter Krispie Bars, but are better known as Scotcheroos. This recipe is a bit different, but a not too sweet take on the original, so far with rave reviews! Reese’s Peanut Butter Krispie Bars 1 1/2 cup sugar 1 1/2 cup peanut butter (I prefer creamy) 1 1/2 cup Karo Light Corn Syrup 9 cups Rice Krispie Cereal 12 Reese’s Peanut Butter cups, regular size First, put your peanut butter cups in the freezer. Measure the Rice Krispies into a large mixing bowl; set aside. Measure the sugar, peanut butter and Karo into a heavy-bottom 3-qt pan; heat on stove at medium temperature, stirring frequently, until the sugar dissolves (not gritty) and the mixture is smooth. While the peanut butter mixture is on the stove, take the Reese’s Peanut Butter Cups out of the freezer, unwrap and chop each peanut butter cup into
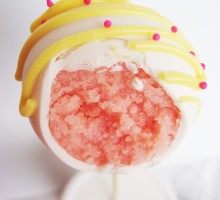
Cake pops. My daughter reminded me that I had done cake pops before (here) and that I needed to do something different. But I couldn’t resist – I’ve found something really wonderful that I just couldn’t wait to tell you about…Pillsbury Pink Lemonade Cake Mix! I really couldn’t wait because I’m very afraid that this is one of those seasonal things that may not be around for long and these are so yummy and make into such scrumptious cake pops with just the right tang to them. I felt the need to tell you to be on the look-out for Pillsbury Pink Lemonade Cake Mix and Frosting! I found mine at Von’s in University City/San Diego, and I bought a few to have on hand for the summer activities that are coming up. I mean, what goes better with summertime than pink lemonade? Yep…that’s a bite out of the cake pop. I certainly didn’t have any problem getting Mike to take a bite out of one, as long as he got to finish it when I was done taking pictures. Keep your eye out for Pillsbury Pink Lemonade Cake Mix and Frosting – delicious! Just in case you were wondering – no. Pillsbury did not pay me to rave about this new flavor. I really like it that much!
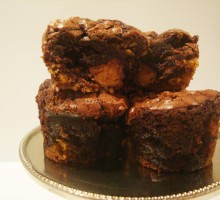
Is it a cookie? A brownie? A candy bar? Well, sort of, if you consider a Reese’s Peanut Butter Cup a candy bar. For the sake of naming the treat, I’m going to consider it such…a Cookie Brownie Candy Bar! I would definitely call this a fully loaded piece of pure delight! Three treats in one. I tried, but I couldn’t figure out something cute to call it, so Cookie Brownie Candy Bar will just have to do! It follows along with one of those new-fangled “hidden” treats inside a treat, and I am especially fond of anything with brownies involved! Recently, I’ve made the Oreo Stuffed Cupcakes and the Oreo Stuffed Brownie – those are both delicious! But that’s one of the hazards of blogging…on to something different. When wandering around the web, I saw where someone had pressed chocolate chip cookie dough in the bottom of a brownie tin, placed a Reese’s Peanut Butter Cup, top side down, onto the dough and then added brownie batter over the top. I meant to pin the idea, but I got distracted and then I couldn’t find it. Don’t you hate it when you do that? I remembered that it used 1 1/2 pre-cut cookie squares, but I wasn’t sure about the temperature and how long to bake them…blah! Time for testing! So here’s the skinny on the not so skinny, but easy to make treat.
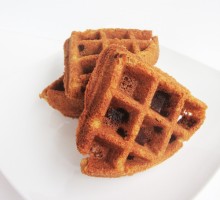
Recipes are best when shared, especially when friends share something super yummy and it comes with samples! Our family has a few deep, dark secrets…family recipe secrets, that is, that a certain one of my children (you know who you are) don’t like to share, so I am really excited when I ask a friend for a recipe and they will actually give it to me! Sometimes it comes with a story, usually anecdotal, that makes the recipe more fun. Thanks for the samples, Jeremy and thanks for typing up the recipe and sending it to me, Mandy! Chocolate Chip Waffle Cookies 1/2 cus unsalted butter, melted and cooled 1/2 cup firmly packed light brown sugar 1/4 cup granulated sugar 1 large egg 1 teaspoon pure vanilla extract Dry ingredients: 1 cup plus 2 tablespoons unbleached all purpose flour 1/2 teaspoon baking soda 1/2 teaspoon salt 1 cup bittersweet chocolate chips or chunks Heat the waffle iron. In a large bowl, whisk the butter and sugars until smooth. Whisk in the egg and vanilla. Sir in flour, baking soda, and salt; finish by stirring in the chocolate chips. Coat the waffle iron with nonstick cooking spray. Use a tablespoon to portion out a cookie onto each waffle square. Close the iron and cook until they begin to brown, about 1 1/2 to 3 minutes. Transfer cookies to a wire rack to cool; repeat