
When life (or friends) give you lemons, make lemonade...cupcakes!

For a quick batch of really delicious, colorful cookies, the journey starts with a white cake mix!
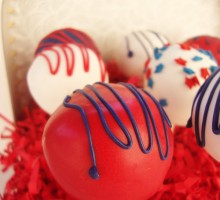
Cake pops…those little balls of sweetness that are perfect for parties, wedding or picnics…in the shade, of course! They are one of my favorite treats to make and take to a potluck gathering because they pack a lot of bang in their diminutive packaging. But you need something to display the little cuties. I am always on the hunt for ways to display them. One day, while on Pinterest, I saw a super cute idea here and was doubly excited knowing that I had one of the little suitcases up in my workroom. Actually, I have them in pink, purple, orange and chartreuse – hooray! I also have them in different sizes. Add some florist foam inside, and some coordinating paper shred to hide it and you are ready to display. If you have different colors of the same size suitcase, you can use the same foam in the different cases. Let the party begin!

It’s almost summer and Mom’s know what that means…children are out of school and looking for something to do…and something to eat. Why not solve two problems with one solution – Smiley Face Pizza! This activity can be done with just one child or a whole gaggle of goofballs. And it wouldn’t be a bad idea to make up a few extra…they warm up nicely and will provide a quick snack later! Click here for complete directions…and a warning! Yep, it’s time again for a new Rhodes Guest Blog Post. This is always a treat for me because I love Rhodes Bake-N-Serv Bread products and they’re such a versatile ingredient for quick and easy recipes. Along with a new Rhodes guest post comes another cookbook giveaway. Here’s what you have to do: Visit the Rhodes Blog and leave a comment…make sure you leave the comment on the Smiley Face Pizza post! Next, come back here and leave a comment…that’s two chances. For a third chance, you can also go to the Rhodes Facebook page, “Like” Rhodes and leave a comment. Each comment will get your “name in the hat” for an extra chance to win – one comment per visitor per site, please. The contest will go until noon (Pacific Time) on Saturday, June 23, 2012 and the winner will be announced later that Saturday evening. Think of all the fun possibilities. Let your children have a little fun playing with their food! Thanks for stopping
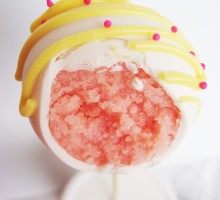
Cake pops. My daughter reminded me that I had done cake pops before (here) and that I needed to do something different. But I couldn’t resist – I’ve found something really wonderful that I just couldn’t wait to tell you about…Pillsbury Pink Lemonade Cake Mix! I really couldn’t wait because I’m very afraid that this is one of those seasonal things that may not be around for long and these are so yummy and make into such scrumptious cake pops with just the right tang to them. I felt the need to tell you to be on the look-out for Pillsbury Pink Lemonade Cake Mix and Frosting! I found mine at Von’s in University City/San Diego, and I bought a few to have on hand for the summer activities that are coming up. I mean, what goes better with summertime than pink lemonade? Yep…that’s a bite out of the cake pop. I certainly didn’t have any problem getting Mike to take a bite out of one, as long as he got to finish it when I was done taking pictures. Keep your eye out for Pillsbury Pink Lemonade Cake Mix and Frosting – delicious! Just in case you were wondering – no. Pillsbury did not pay me to rave about this new flavor. I really like it that much!
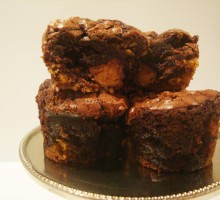
Is it a cookie? A brownie? A candy bar? Well, sort of, if you consider a Reese’s Peanut Butter Cup a candy bar. For the sake of naming the treat, I’m going to consider it such…a Cookie Brownie Candy Bar! I would definitely call this a fully loaded piece of pure delight! Three treats in one. I tried, but I couldn’t figure out something cute to call it, so Cookie Brownie Candy Bar will just have to do! It follows along with one of those new-fangled “hidden” treats inside a treat, and I am especially fond of anything with brownies involved! Recently, I’ve made the Oreo Stuffed Cupcakes and the Oreo Stuffed Brownie – those are both delicious! But that’s one of the hazards of blogging…on to something different. When wandering around the web, I saw where someone had pressed chocolate chip cookie dough in the bottom of a brownie tin, placed a Reese’s Peanut Butter Cup, top side down, onto the dough and then added brownie batter over the top. I meant to pin the idea, but I got distracted and then I couldn’t find it. Don’t you hate it when you do that? I remembered that it used 1 1/2 pre-cut cookie squares, but I wasn’t sure about the temperature and how long to bake them…blah! Time for testing! So here’s the skinny on the not so skinny, but easy to make treat.

Wendy C, who said: “I would love to win this cook book. My son loves Rhodes bread rolls.” Congratulations, Wendy C.!!! Please send me your address and I will get the cookbook on it’s way to you! Just to let everyone else know, I do a guest post with Rhodes about every 8 weeks, so before you know it, there will be another giveaway…that’s before I know it as well! Funny how things like this have a way of sneaking up on you! If you missed it, you can visit the post for Bacon Cheese Nibbles here!
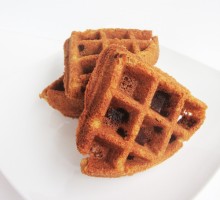
Recipes are best when shared, especially when friends share something super yummy and it comes with samples! Our family has a few deep, dark secrets…family recipe secrets, that is, that a certain one of my children (you know who you are) don’t like to share, so I am really excited when I ask a friend for a recipe and they will actually give it to me! Sometimes it comes with a story, usually anecdotal, that makes the recipe more fun. Thanks for the samples, Jeremy and thanks for typing up the recipe and sending it to me, Mandy! Chocolate Chip Waffle Cookies 1/2 cus unsalted butter, melted and cooled 1/2 cup firmly packed light brown sugar 1/4 cup granulated sugar 1 large egg 1 teaspoon pure vanilla extract Dry ingredients: 1 cup plus 2 tablespoons unbleached all purpose flour 1/2 teaspoon baking soda 1/2 teaspoon salt 1 cup bittersweet chocolate chips or chunks Heat the waffle iron. In a large bowl, whisk the butter and sugars until smooth. Whisk in the egg and vanilla. Sir in flour, baking soda, and salt; finish by stirring in the chocolate chips. Coat the waffle iron with nonstick cooking spray. Use a tablespoon to portion out a cookie onto each waffle square. Close the iron and cook until they begin to brown, about 1 1/2 to 3 minutes. Transfer cookies to a wire rack to cool; repeat

UPDATE AT BOTTOM OF THIS POST! Yes, I know…it’s that time again! This is one of my favorite posts to do because making delicious recipes with Rhodes is as easy as 1…thaw, 2…cut and dip, and 3…top, rest (both the dough and me) and bake! On a cold, rainy day, the aroma of bacon, cheese and bread filled the whole house as the boys bounded in, hungry from school and work! Yet another delectable addiction…I mean addition…to our family’s Rhodes repertoire! You can read all the details over at the Official Rhodes Blog. But before you go, I want you to know that I’m having a special cookbook give-away this post, courtesy of Rhodes. This is a really fun cookbook – either if you have kids or you want to wow your guests/co-workers/friends with your amazing artistic abilities. (My sister-in-law made a bunny for the family Easter party and it was a hugh hit! Here’s what you need to do: Visit the Rhodes Blog and leave a comment. Next, come back here and leave a comment…that’s two chances. For a third chance, you can also go to the Rhodes Facebook page, “Like” Rhodes and leave a comment. Each comment will get your “name in the hat” for an extra chance to win – one comment per visitor per site, please. The contest will go until noon (Pacific Time) on Saturday, April 21, 2012 and the winner will be announced later that
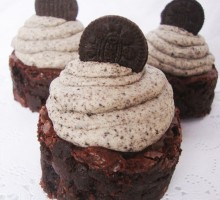
Yet another Pinterest inspired recipe…I am determined to try things out right away and expand my recipe collection, or toss the idea away. Some people can snap a picture of something that looks really yummy, but the final taste doesn’t meet my expectations. A couple of weeks ago, I found a delicious looking cupcake using Mint Oreos: Oreos in the middle, in the frosting and on top. I didn’t have the Mint Oreos, but I used regular Oreos and made them for our family Easter party, and they were delicious. I had a little trouble with the frosting…all those crunched cookies had trouble going through the tip, and the pastry bag was already full, I needed to get out the door and on the road, blah, blah, blah…so they weren’t as pretty as I wanted them to be…you can see them here. Anyway, I was going to make the cupcakes again for the boy’s party tonight, but then I decided to try something a little different – Oreo Stuffed Brownies – and they turned out delicious! I didn’t take a lot of pictures, but here’s what I did and it was really easy. For these brownies, I used two packages from a big box of Ghirardelli Brownie mix that I got from Costco, and prepared the mix according to the directions on the box. Spray the bottom of the pan with non-stick spray,